If you need help with a guide for wired CCTV camera installation or are facing issues, then no need to fret; “Issue Repair” is here for you. Installing a wired CCTV camera system may seem complicated, but when done properly, it is not that bad of a deal. This guide illustrates a few easy steps, ensuring that your property is well-monitored and secure.
Understanding Wired CCTV Systems
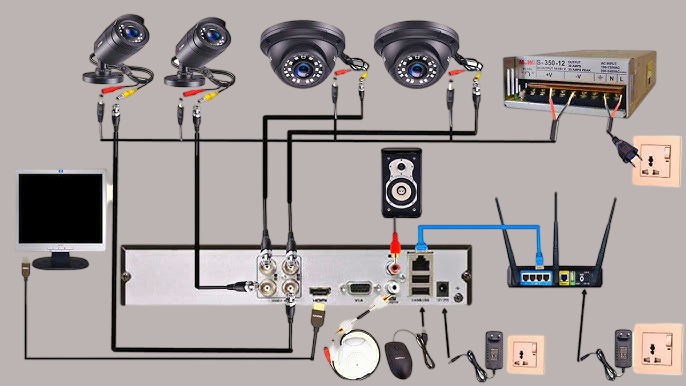
Wired CCTV systems use cables to connect cameras to a central recording device, such as a Digital Video Recorder (DVR) or Network Video Recorder (NVR). These systems are known for their reliability and high-quality video transmission. Before you begin the installation, it’s essential to understand the components involved:
- Cameras: The devices that capture video footage.
- Cables: Typically, RG-59 Siamese cables are used for analog systems, while CAT5/6 cables are used for IP systems.
- DVR/NVR: The device that records and stores the video footage.
- Power Supply: Provides electricity to the cameras.
Tools and Materials Needed
Before starting the installation, gather the following tools and materials:
- CCTV cameras
- DVR or NVR
- Cables (RG-59 or CAT5/6)
- Power supply
- Drill
- Fish tape (optional)
- Cable connectors (BNC for RG-59, RJ-45 for CAT5/6)
- Crimping tool (for making custom cable lengths)
- Screws and anchors
- Ladder
- Electrical tape
Step-by-Step Installation Process
Step 1: Planning Your Camera Locations
Before you start drilling holes and running cables, plan where you want to install your cameras. Consider the following:
- Coverage Area: Identify the areas you want to monitor, such as entry points, driveways, and backyards.
- Height: Mount cameras at least 9 feet above the ground to avoid tampering and to capture a wider field of view.
- Power Sources: Ensure that there are power outlets nearby or plan to run power cables from a central location.
Step 2: Running the Cables
Once you have determined the camera locations, it’s time to run the cables.
- Drill Holes: Use a drill to create holes in walls or ceilings where the cables will pass through. If running cables through walls, consider using a wall plate for a cleaner look.
- Use Fish Tape: If you need to run cables through walls, use fish tape to pull the cables through the drilled holes. This tool helps guide the cables without damaging them.
- Label Cables: As you run cables, label each end to identify which camera it corresponds to. This will make the connection process easier later on.
Step 3: Connecting the Cameras
After running the cables, it’s time to connect the cameras to the DVR/NVR.
- For RG-59 Cables:
- Strip the ends of the coaxial cable and connect BNC connectors to each end.
- Connect one end to the camera and the other to the DVR.
- Use the 18-gauge wires within the Siamese cable to connect to the power supply.
- For CAT5/6 Cables:
- Use a crimping tool to attach RJ-45 connectors to the ends of the cables.
- Connect one end to the camera and the other to the NVR.
- If using Power over Ethernet (PoE), ensure that the NVR or a PoE switch is connected to a power source.
Step 4: Powering the Cameras
Once the cameras are connected, it’s time to power them up.
- Plug in the Power Supply: Connect the power supply to the cameras using the 18-gauge wires for RG-59 or ensure that the PoE switch is powered for CAT5/6 setups.
- Check Connections: Ensure all connections are secure and properly insulated with electrical tape to prevent short circuits.
Step 5: Configuring the DVR/NVR
After powering the cameras, configure your DVR or NVR to start recording.
- Connect the DVR/NVR to a Monitor: Use an HDMI or VGA cable to connect the DVR/NVR to a monitor for setup.
- Access the Menu: Use the remote control or mouse to access the DVR/NVR menu.
- Set Up Recording Options: Configure the recording settings, including motion detection, continuous recording, and scheduled recording.
- Test the Cameras: Check each camera’s feed to ensure they are functioning correctly and capturing the desired areas.
Step 6: Finalizing the Installation
Once everything is set up and tested, finalize your installation.
- Secure Cables: Use cable clips or ties to secure any exposed cables along walls or ceilings to prevent tripping hazards.
- Weatherproofing: If cameras are installed outdoors, ensure that all connections are weatherproofed to prevent moisture damage.
Maintenance Tips
To ensure your wired CCTV system continues to function optimally, consider the following maintenance tips:
- Regularly Check Camera Angles: Periodically check the camera angles to ensure they are still capturing the intended areas.
- Clean the Lenses: Dust and debris can obstruct the camera’s view. Clean the lenses regularly with a soft cloth.
- Inspect Cables: Check for any signs of wear or damage to the cables and replace them if necessary.
Conclusion
Installing a wired CCTV camera system is an important step towards ensuring security and peace of mind. While the process involves technical matters such as wiring, positioning, and configuration, assisting experts can make a big difference in the flawless set-up of a CCTV camera system. For those in Noida, Delhi, Ghaziabad, Faridabad, Gurgaon, Khatauli, Meerut, Greater Noida, or elsewhere within NCR, Gen1Service is the way to go. Their qualified technicians-with ample experience-will install the said cameras professionally and without a hitch. For expert consultations and assured installation of CCTV cameras, you can contact Gen1Service at 9411001216. There will also be assistance available on their website so that your security system will be differentiated from the ineffective to a system in which security will be installed with higher precision and speed. Don’t compromise when it comes to security; allow the experts to protect your home or business by installing a reliable CCTV system.